Previously: Building an ASP.NET Core IdentityServer Implementation
Getting Started with Kubernetes - Minikube - Part A
We're finally getting to the part of the series where we have a group of applications and we want to have them live in Kubernetes (k8s). In order to do that, we need to have k8s on our local development machine and we are going to use Minikube to do that.
Important Caveat
I'm going to make an assumption that at a minimum, you've reviewed various types of k8s resources on kubernetes.io and in a best case scenario, you've watched Nigel Poulton's Pluralsight course Getting Started with Kubernetes. If you haven't, my discussions about these topics may be harder to understand because they do not cover these basics.
Also, my understanding of Kubernetes is certainly not as extensive as I'd like. I'm not sure I'd hazard calling myself an expert. I've got a working cluster and applications in that cluster but I am not going to make the statement that I've done it all right or with the current best practices in place. This is a learning exercise for me (and you) and while I want to get you with a cluster up and running as soon as possible, I expect you to learn/challenge/grow your k8s cluster knowledge as well.
Getting started
Thankfully, I don't have to create a huge blog post on this! There is already some great documentation at kubernetes.io that gets you setup with a learning environment based on minikube so I'll just let you go there and read the installation guide! I'm using v1.9.2 of minikube during the creation of this series of articles.
A Powershell Script
It is certainly easy enough to remember some commands when standing up your environment, but as we work through getting everything into minikube using the command-line and manifests, it can become quite a list of commands and so I'd recommend creating a powershell script that you can capture your commands in the order that you are likely to execute them.
The way that I've been structuring my source files is:
1 | project_root |
The src folder is where the ASP.NET Core applications are. You can ignore the infra directory for a while, but for this part of the journey, we'll be using the manifests folder to store all of our k8s declarative manifest files. This is also where I store my stand-up.ps1 powershell script file!
The first line in your stand-up.ps1 file should probably be (if your on windows):
1 | minikube start --vm-driver=hyperv --cpus=4 --memory=16g --extra-config=apiserver.service-node-port-range=80-33000 |
This is saying:
- start minikube
- use the hyperv driver
- with 4 logical CPUS (4 of the n you have in Task Manager - Performance Tab)
- with 16 gb of memory
- 20 gb of disk space (default value)
- and expanding the range of usable ports in minikube
You're going to want to adjust these numbers to what make sense for your workstation. I have a i9-9900k with 64 gbs of memory, so these numbers makes sense for me. You can certainly run all of this on 1 CPU and 4 gb of RAM with no problems. As you build k8s clusters with more hosted pods, you'll probably need to increase the values when starting minikube.
It is important to understand that this command creates a virtual machine, running linux, in hyperv, on your local workstation. If you want to change these parameters, you'll need to destroy your current minikube instance and re-create a new one.
Out of the box, k8s (minikube) limits the port range of containers in the cluster to 30000-33000. I've expanded this range because I want to use the same port values that we used in docker. This expanded range allows k8s in minikube to use more ports, but it doesn't claim all of them.
After the minikube VM has been created (which may take a few minutes), we can then invoke our next command to make sure it is up and running!
1 | # Start a tunnel from your local machine into minikube and the kubernetes dashboard |
Using this powershell command, the process creating the tunnel is started and control of the shell is returned to you, but the process remains running. When you close down this shell, the running process will also be closed and the tunnel will close.
Hopefully, the tunnel started, a browser window opened and you can see the Kubernetes Web UI for your new minikube k8s cluster! Let's leave this browser window open and we can keep our eyes on it.
Putting your backend into the cluster
Now that k8s is running on your local machine, we can start to install our backend services into the cluster. We'll do this activity first, with easy to configure pods, to get used to working with manifests. Installing our IdentityServer4-based applications will require some additional resources and automation.
In this section, we will start the process of converting our docker-compose.yml into a bunch of k8s manifest files. We could do this as a monolithic manifest file, but I prefer smaller manifest files. They are easier to think about and just as easy to use.
Postgres manifests
If we look at the postgres section of our docker-compose.yml file, we will see a couple of things.
1 | postgresdb: |
- an image from DockerHub
- container name
- ports that are exposed
- environmental variable declarations
- attached persistent volumes
- network alias
In k8s, those concepts are separated into different types of resources that we will want to provision. Generally speaking, the container-based resources will be described in a Deployment manifest and the network-based resources will be described in a Service manifest.
I tend to clump container-based concerns into a manifest file. So in this case, with postgres, I will also describe the PersistentVolume resources in with the Deployment resources.
1 | apiVersion: v1 |
Let's decompose that Deployment manifest in more detail.
PersistenVolume
From kubernetes.io...
A PersistentVolume (PV) is a piece of storage in the cluster that has been provisioned by an administrator or dynamically provisioned using Storage Classes. It is a resource in the cluster just like a node is a cluster resource.
So we need to have some disk space made available for us to use in the cluster.
1 | apiVersion: v1 |
The TL;DR; (too long; didn't read it) description of this resource description is:
- Create a volume on the linux host (k8s node)
- at the path described
- make it 1Gi large
- only let one node (VM/host) connect to it
PersistentVolumeClaim
From kubernetes.io...
A PersistentVolumeClaim (PVC) is a request for storage by a user. It is similar to a Pod. Pods consume node resources and PVCs consume PV resources. Pods can request specific levels of resources (CPU and Memory).
We need to claim some of the disk resources from the cluster (the PersistentVolume) in the same way that we would request some CPU or memory capacity from the cluster. It is important to explore the relationship between PV and PVC. This blog article provides some insights as does this Stack Overflow Question/Answer.
As I understand it, we will need to do this PV+PVC technique because we are using minikube, not AKS, and the storageClassName that we are using (manual) doesn't allow for dynamic provisioning of the storage resource. This will change when we move to AKS.
1 | apiVersion: v1 |
Deployment
So we have the persistent storage that we want for our database setup. Now we need to get postgres deployed into our cluster.
1 | apiVersion: apps/v1 |
There is a lot that goes into a Deployment manifest. You can see more details here in the event that you need a refresher.
We've created this manifest that will stand-up Postgres in the k8s cluster. Now we can use kubectl to run this manifest against our cluster.
First, let's make sure our kubectl is configured to point at minikube.
kubectl config current-context should report minikube.
Next, let's run the postgre-dep.yml file through kubectl.
kubectl create -f .\postgres-dep.yml
1 | PS D:\temp\testidentity\MyProject\manifests> kubectl create -f .\postgres-dep.yml |
Now go to the browser window that is showing you the Kubernetes Web UI and you should see all of the new resources in your cluster!
PersistentVolume In the Cluster
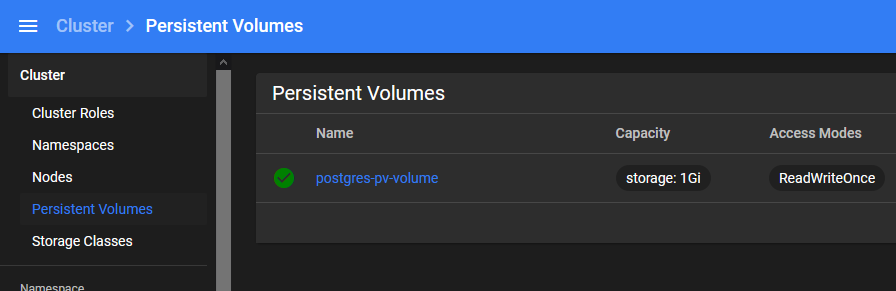
Notice how this PV is a resource in the cluster and not related to any particular pod.
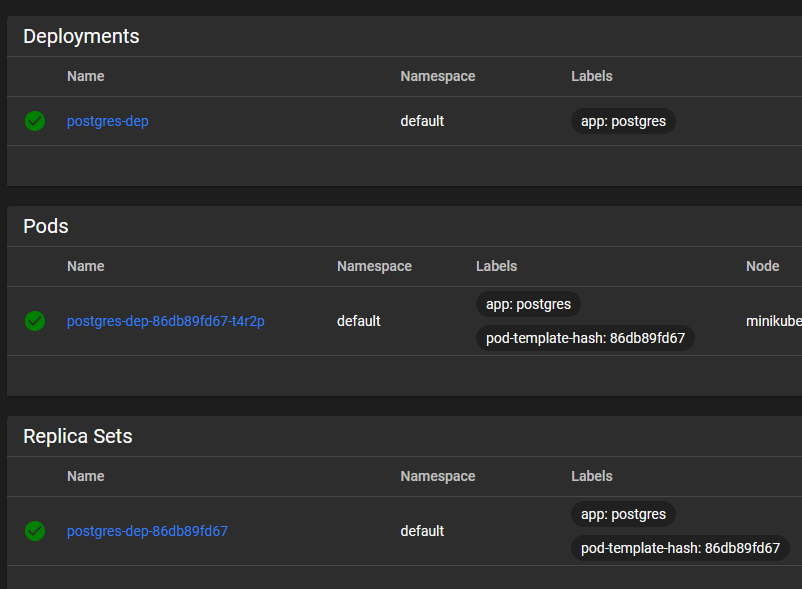
Postgres-based Resources
If you'd like to see only the Postgres resources,you can use the Search bar to filter everything else out.

And now we can see all of the resources we just deployed, and explore them in more detail individually.
So that completes putting our Postgres database into the cluster! Now we have to expose it.
Postgres Service Manifest
From kubernetes.io...
An abstract way to expose an application running on a set of Pods as a network service. With Kubernetes you don’t need to modify your application to use an unfamiliar service discovery mechanism. Kubernetes gives Pods their own IP addresses and a single DNS name for a set of Pods, and can load-balance across them.
Generally, you want to present as little surface area for security reasons as possible, so I have no desire to expose the database outside of the cluster. We still need a service resource created so that the container gets a DNS name within the cluster, and as containers/pods come and go, the cluster will ensure that the DNS entry always points to the right place.
So in this service manifest, we are basically telling k8s to map the DNS entry postgres-svc to whatever pod spins up with the label app:postgres.
1 | apiVersion: v1 |
pgAdmin4 Deployment manifests
The pgAdmin4 deployment manifest is very similar to the postgres-dep.yml file we've created already. So I'll just post it in here so you can take a look at it. The only things that are really different are the environmental variables and the names of things.
1 | apiVersion: v1 |
pgAdmin4 Service manifests
Since I do want to be able to access the pgAdmin4 application from outside of the cluster, we need to make a service manifest that exposes the pgAdmin4 pod.
1 | apiVersion: v1 |
Simply speaking, this manifest says to create a NodePort service resource for this pod and expose it on port 5050. Notice that the spec: selector: is saying that this service will be applied to pods with the same label of pgadmin4. Remember, in k8s, labels are usually very important. And because of the type: NodePort on this service, we will be able to access this pod from outside of the cluster.
If you want to expose your Postgres resource outside of the cluster, you can change that manifest to create a type: NodePort service exposing the postgres pod on port 5432.
Now we need to use kubectl to create this resource in the cluster.
kubectl create -f .\pgadmin4-svc.yml
You should see the new pgAdmin4 resources in your cluster.
We can also now use another feature of minikube which allows you to expose services in your cluster to the outside world on minikube's IP address. In order to expose pgAdmin4, simply type:
minikube service pgadmin4-svc
Minikube should then create a tunnel into the cluster for you, and open a web browser to the URL that was generated!
You can also use minikube service list at any time to see a list of the exposed services in your cluster.
1 | PS D:\temp\testidentity\MyProject\manifests> minikube service list |
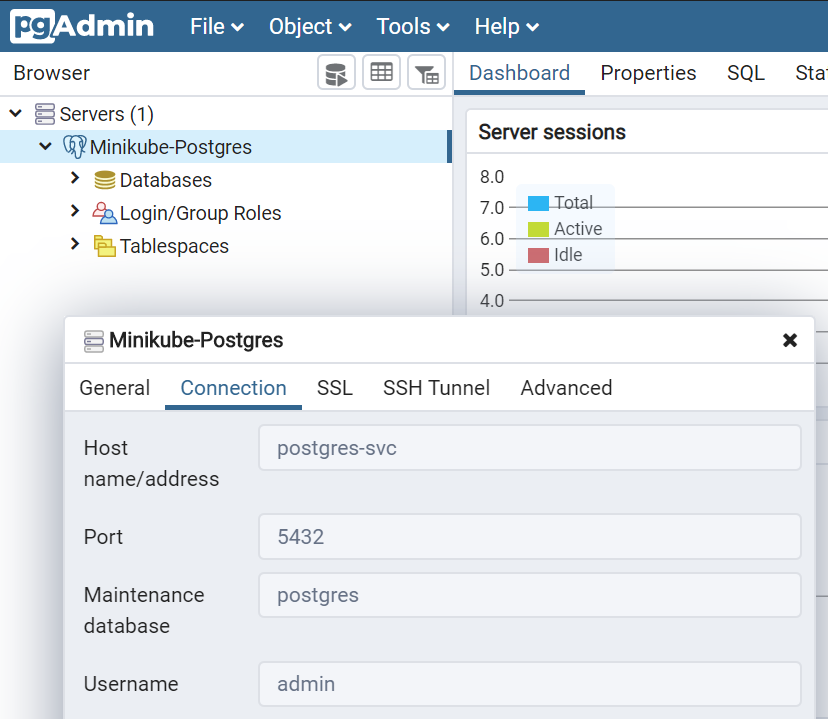
You should be able to log into pgAdmin4 with the credentials we've come to know and love (user: admin@codingwithdave.xyz pwd: P@ssw0rd!). Once in there, you will be able to re-create your server list entry, but this time, the location of the server is the name of the postgres service, as described in the metadata: element of the yaml.
1 | metadata: |
Seq Deployment manifests
The Seq deployment manifest is very similar to the others we've created already. So take a look, and then put Seq into your minikube cluster.
1 | apiVersion: v1 |
kubectl create -f .\seq-dep.yml will get your resources created!
Seq Service manifests
We want to see Seq outside of the cluster, so we will also want to expose it with a NodePort service.
1 | apiVersion: v1 |
kubectl create -f .\seq-dep.yml will get your service resource created!
Then expose your service via:
minikube service seq-svc
And voila! A browser window opens and you'll see Seq!! Nothing is logging there yet, but it's there! Woo hoo!!
Summary
Hopefully now, you've shifted all of the backend services required for our IdentityServer4 applications into minikube! They are all up and running, and you've been able to access pgAdmin4 (connected to the postgres db) and you've been able to access Seq, even if nothing is logging to it!
This has been really long post, so I'm going to take a break, let you have a break, and continue on to Part B of putting our system in Minikube!
Next up: Getting Started with Kubernetes - Minikube - Part B
