<?xml version="1.0" encoding="utf-8"?>
<feed xmlns="http://www.w3.org/2005/Atom">
  <title>Western Devs</title>
  
  <link href="/feeds/tom_opgenorth" rel="self" type="application/atom+xml"/>
  <link href="https://westerndevs.com" rel="alternate" type="application/atom+xml"/>
  
  <updated>2026-03-22T17:42:31.821Z</updated>
  <id>https://westerndevs.com/</id>
  
  <author>
    <name>Western Devs</name>
	<uri>https://westerndevs.com</uri>
    <email>info@westerndevs.com</email>
  </author>
  
  <generator uri="http://hexo.io/">Hexo</generator>
  
  <entry>
    <title type="html">Don&#39;t Let Crud, Corruption, and Communism Kill Your Smart Watch</title>
    <link href="https://westerndevs.com/_/dont-let-crud-corruption-and-communism-kill-your-smart-watch/" rel="alternate" type="text/html"/>
    <id>https://westerndevs.com/_/dont-let-crud-corruption-and-communism-kill-your-smart-watch/</id>
    <published>2015-09-26T00:56:05.000Z</published>
    <updated>2026-03-22T17:42:31.821Z</updated>
	<author>
	
	  
	  <name>Tom Opgenorth</name>
	  <email>tom@opgenorth.net</email>
	
	  <uri>https://westerndevs.com</uri>
	</author>
    
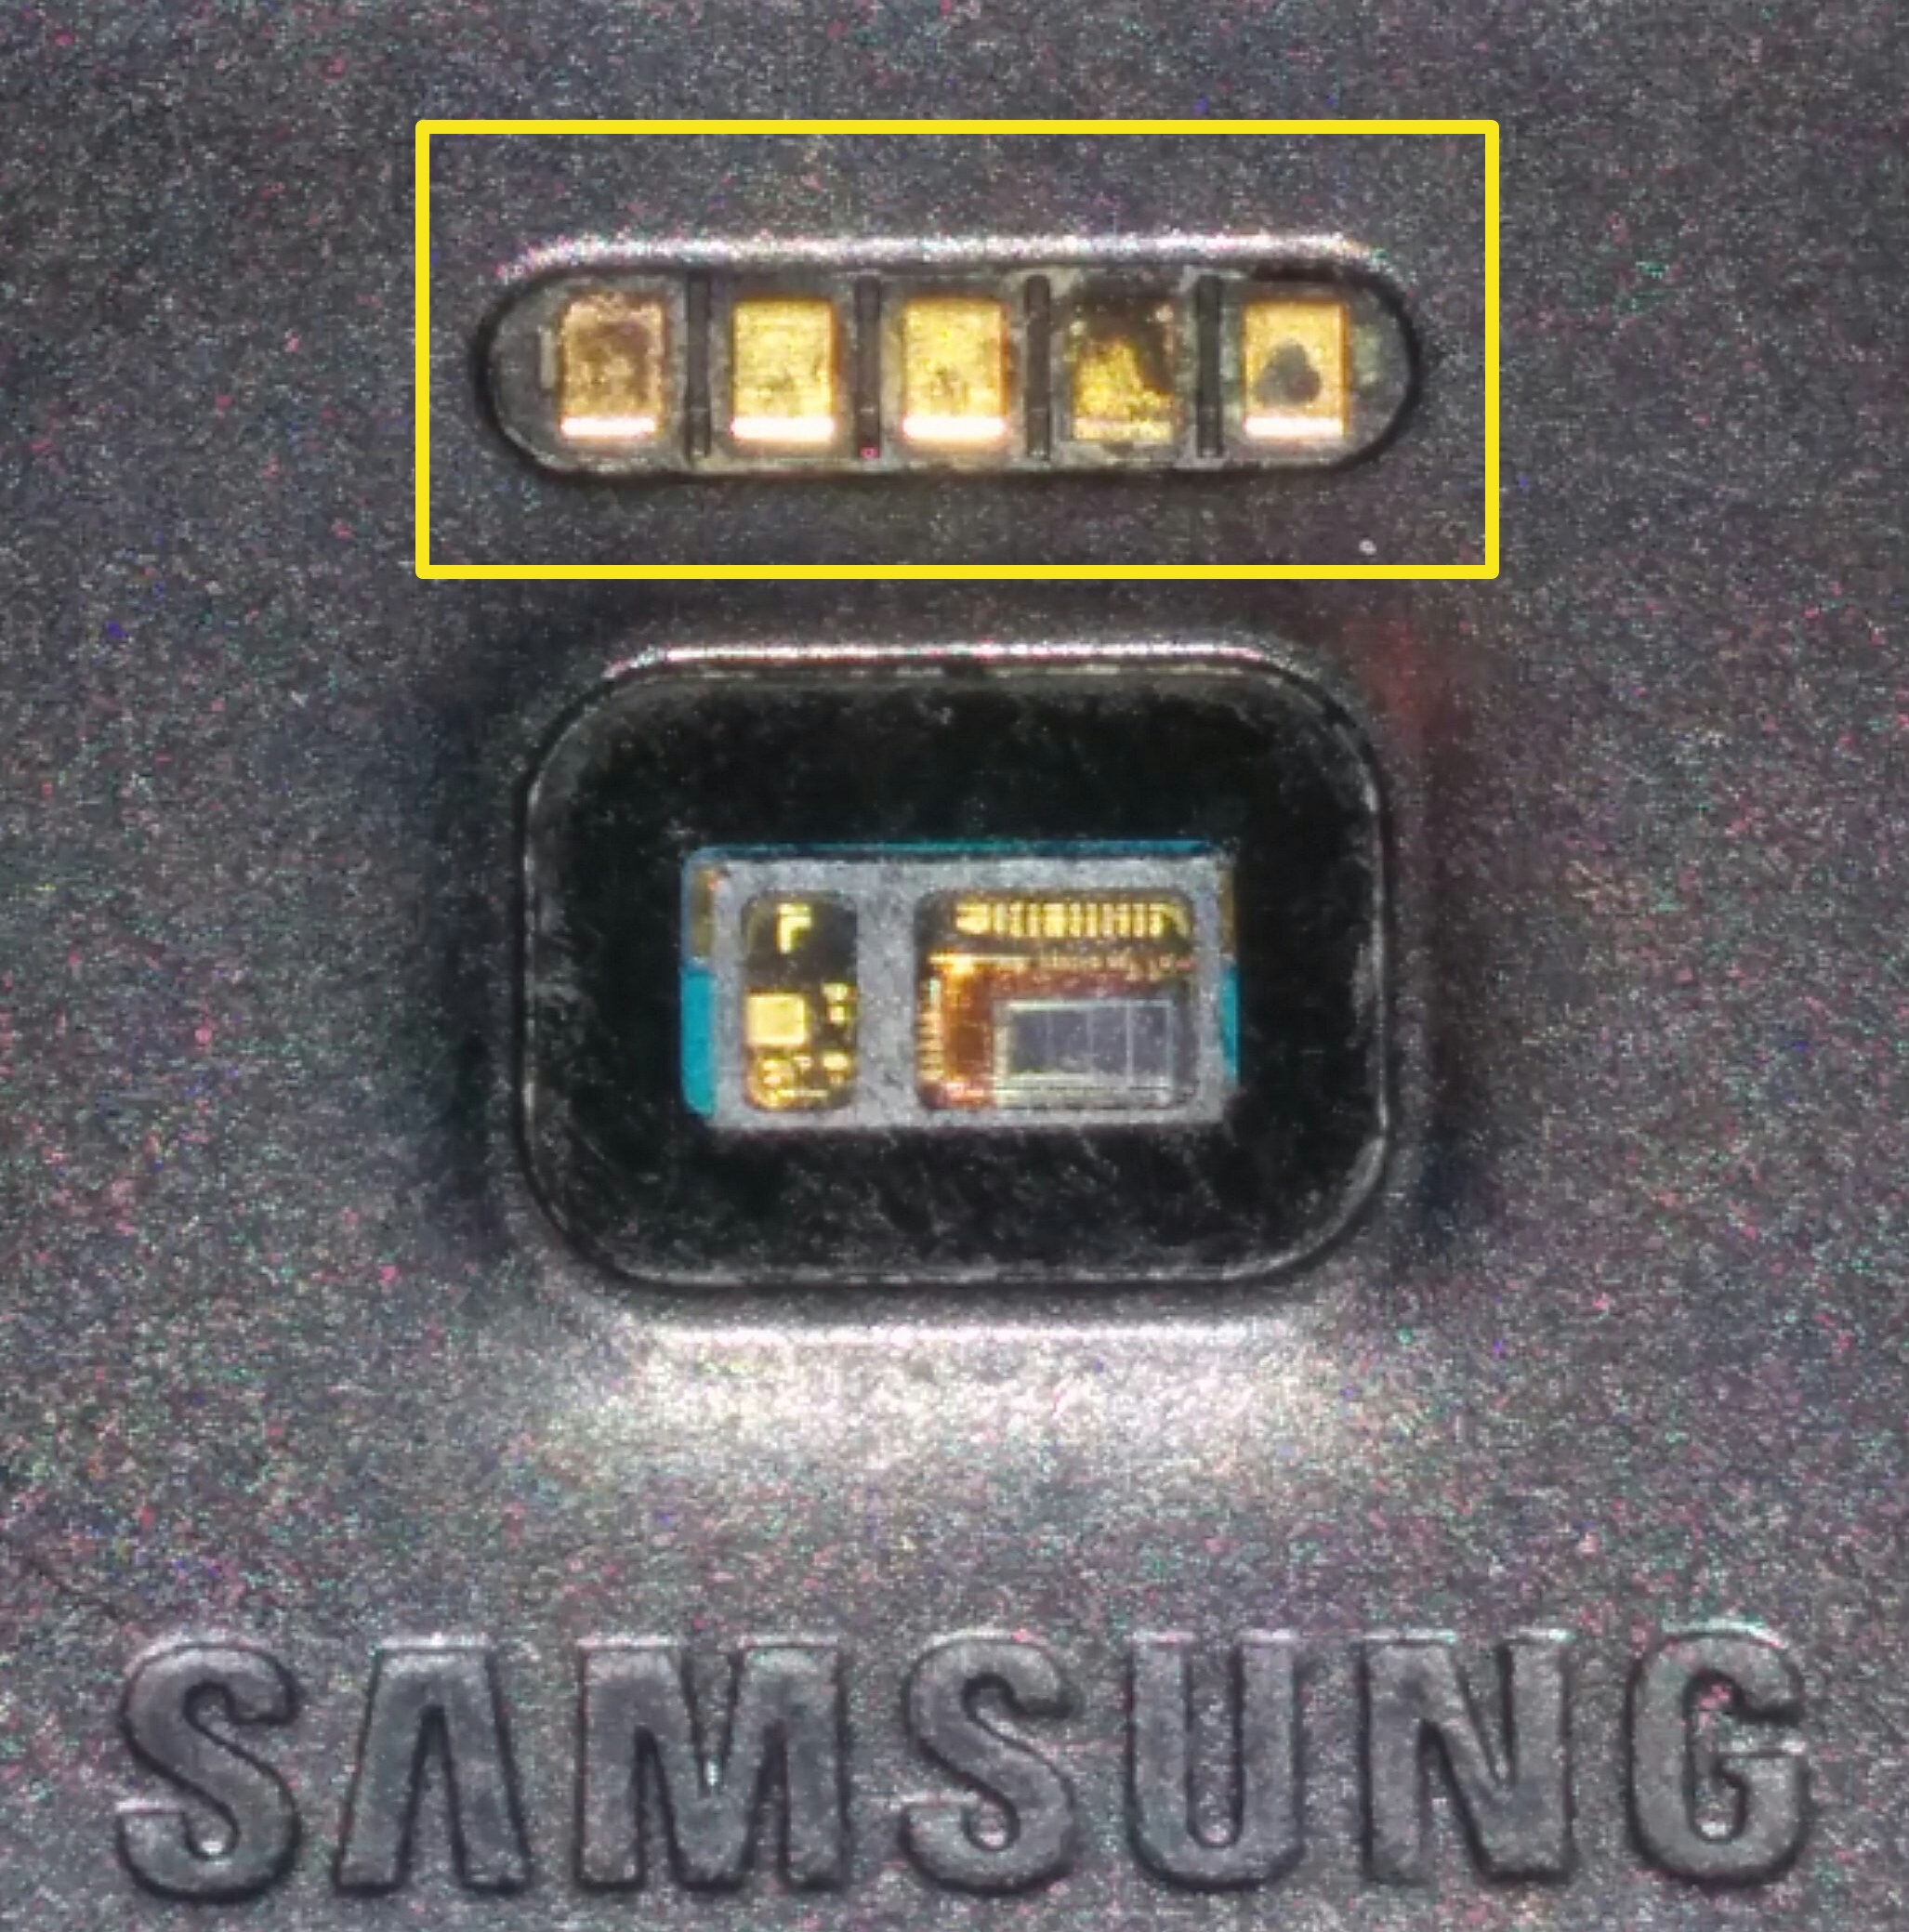
    <content type="html"><![CDATA[<p>I have a <a href="http://www.samsung.com/global/microsite/gear/gearlive_design.html" target="_blank" rel="noopener">Samsung Gear Live</a>. One day, all of sudden, it wouldn't turn on after I had it charging in it's little charging dock. I thought the problem was with the watch, and Google the symptoms led me to one of two conclusions:</p><a id="more"></a><ol><li>The watch was defective, and I should send it back under warranty.</li><li>I could fix the problem by taking the watch apart, disconnecting the battery for a minute, and then reconnecting the battery. Or something like that.</li></ol><p>I was a bit dismayed that for a device not even a year old that these were my options. I was mulling over the options, and I flipped the watch over to see what tools I would need to take the watch apart (who doesn't like disassembling electronics), when I notice that the contact points on the watch were filthy (as one the NCOs on my infantry course used to say when inspecting rifles – &quot;crud, corruption, and communism&quot;). You can see the contacts for the charging dock right in the picture below:</p><p><img src="/images/back-of-samsung-gear-live.jpg" alt=""></p><p>I figured cleaning these contact points was easier than taking the watch apart and quicker than sending the watch back, so I grabbed an eraser and gave the contacts a quick scrub.  I plugged the watch back into the charging cradle, and all of a sudden it started charging again.</p><p>I've had to do this a couple of times now. I recently found out that some erasers may leave a thin film of residue that may attract dirt. There are a couple of options available:</p><ol><li><strong>Rubbing alcohol and a Q-Tip</strong>. One fellow I work with will clean the back of his watch every week with this.</li><li><strong>CAIG Deoxit</strong>. Another co-worker with an electronics background suggested <a href="http://www.parts-express.com/caig-deoxit-d5s-6-spray-5-oz--341-200?utm_source=google&amp;utm_medium=cpc&amp;utm_campaign=pla" target="_blank" rel="noopener">Deoxit</a> by Caig. Put a bit on a Q-Tip, and then clean away. This product will not only clean the contacts and remove oxidation but will leave behind a thin layer to help prevent oxidation.</li></ol><p>Anybody else experienced this problem with their watch? What solutions did you use?</p>]]></content>
    
    <summary type="html">
    
      &lt;p&gt;I have a &lt;a href=&quot;http://www.samsung.com/global/microsite/gear/gearlive_design.html&quot; target=&quot;_blank&quot; rel=&quot;noopener&quot;&gt;Samsung Gear Live&lt;/a&gt;. One day, all of sudden, it wouldn&#39;t turn on after I had it charging in it&#39;s little charging dock. I thought the problem was with the watch, and Google the symptoms led me to one of two conclusions:&lt;/p&gt;
    
    </summary>
    
    
  </entry>
  
  <entry>
    <title type="html">An Intro to Android Data Binding</title>
    <link href="https://westerndevs.com/_/an-intro-to-android-data-binding/" rel="alternate" type="text/html"/>
    <id>https://westerndevs.com/_/an-intro-to-android-data-binding/</id>
    <published>2015-09-16T06:32:12.000Z</published>
    <updated>2026-03-22T17:42:31.819Z</updated>
	<author>
	
	  
	  <name>Tom Opgenorth</name>
	  <email>tom@opgenorth.net</email>
	
	  <uri>https://westerndevs.com</uri>
	</author>
    
    <content type="html"><![CDATA[<p>In May, 2015 at Google announced <a href="https://developer.android.com/tools/data-binding/guide.html" target="_blank" rel="noopener">a data binding library for Android</a>. It's long overdue – developers no longer have to come up with their own schemes for displaying or retrieving data from their views. With two-way data binding, it's possible to remove a lot of redundant boilerplate code from the activities and fragments that make up an application.</p><a id="more"></a><p><em>Just a warning - Android data binding is still a beta product, so as such things may or may not work when they should, as they should, and the documentation may or may not be accurate.</em></p><p>There were several steps/phases that I went through while I was learning this. Here's what I did:</p><ol><li><strong>Add data binding to Android Studio</strong> – This is a one time thing, a couple of lines in some Gradle files.</li><li><strong>Create a POJO for the binding</strong> – You don't necessarily want to bind to a domain object. Arguable it's a cleaner design to have another class with responsiblity of data binding (and maybe some validation too). Model-View-ViewModel is an excellent pattern in this regard.</li><li><strong>Update the layout file</strong> – We help the data binding library out by adding some meta-data/markup to our layout files.</li><li><strong>Update the activity to declare the data binding</strong> – This will tell the data binding library how to connect the views to the POJO.</li></ol><p>The <a href="https://github.com/topgenorth/drunken-bear" target="_blank" rel="noopener">source code for this sample</a> is up on Github.</p><h1>Adding Data Binding to Your Project</h1><p>First off, make sure you're running Android Studio 1.3 or higher. As long as you're keeping current with the Android Studio</p><p>Next I had to edit the project's <strong>build.gradle</strong> file, my  <code>dependencies</code> section looks like this:</p><pre><code>dependencies {    classpath 'com.android.tools.build:gradle:1.3.1'    // TODO: when the final verison of dataBinder is release, change this to use a version number.    classpath 'com.android.databinding:dataBinder:1.+'}</code></pre><p>After that, I updated the <strong>build.gradle</strong> for the app module. The first two line in the file are:</p><pre><code>apply plugin: 'com.android.application'apply plugin: 'com.android.databinding'</code></pre><p>That's pretty much about it. Now that our project is aware of data binding, let's see about the code and UI changes I had to make.</p><h1>Using Data Binding</h1><p>From here, you might be best off reading <a href="https://developer.android.com/tools/data-binding/guide.html" target="_blank" rel="noopener">Google's docs on data binding</a>, just to get a feel for how things work. If you're familiar with data binding in XAML (say WPF or Xamarin.Forms), you might notice some simularities.</p><p>(<em>Allow me digress a bit and offer this piece of advice again: think twice about binding directly to your data model. This is a perfect opportunity to bring some Model-View-ViewModel goodness into your Android application. I'm not going to talk to much about MVVM though.</em>)</p><h2>Updating the Source Code</h2><p>To keep my UI as code free as possible, I abstracted much of the data binding logic into the following class (his isn't all the code, just the parts relevant for this example):</p><figure class="highlight java"><table><tr><td class="gutter"><pre><span class="line">1</span><br><span class="line">2</span><br><span class="line">3</span><br><span class="line">4</span><br><span class="line">5</span><br><span class="line">6</span><br><span class="line">7</span><br><span class="line">8</span><br><span class="line">9</span><br><span class="line">10</span><br><span class="line">11</span><br><span class="line">12</span><br><span class="line">13</span><br><span class="line">14</span><br><span class="line">15</span><br><span class="line">16</span><br><span class="line">17</span><br><span class="line">18</span><br><span class="line">19</span><br><span class="line">20</span><br><span class="line">21</span><br><span class="line">22</span><br><span class="line">23</span><br><span class="line">24</span><br><span class="line">25</span><br><span class="line">26</span><br><span class="line">27</span><br><span class="line">28</span><br><span class="line">29</span><br><span class="line">30</span><br><span class="line">31</span><br><span class="line">32</span><br><span class="line">33</span><br><span class="line">34</span><br><span class="line">35</span><br><span class="line">36</span><br><span class="line">37</span><br><span class="line">38</span><br><span class="line">39</span><br><span class="line">40</span><br><span class="line">41</span><br><span class="line">42</span><br><span class="line">43</span><br><span class="line">44</span><br><span class="line">45</span><br><span class="line">46</span><br><span class="line">47</span><br><span class="line">48</span><br></pre></td><td class="code"><pre><span class="line"><span class="keyword">public</span> <span class="class"><span class="keyword">class</span> <span class="title">PhonewordViewModel</span> <span class="keyword">extends</span> <span class="title">BaseObservable</span> </span>&#123;</span><br><span class="line">    <span class="keyword">private</span> <span class="keyword">boolean</span> mIsTranslated = <span class="keyword">false</span>;</span><br><span class="line">    <span class="keyword">private</span> String mPhoneNumber = <span class="string">""</span>;</span><br><span class="line">    <span class="keyword">private</span> String mPhoneWord = <span class="string">""</span>;</span><br><span class="line">    <span class="keyword">private</span> String mCallButtonText = <span class="string">"Call"</span>;</span><br><span class="line"></span><br><span class="line">    <span class="meta">@Bindable</span></span><br><span class="line">    <span class="function"><span class="keyword">public</span> String <span class="title">getPhoneNumber</span><span class="params">()</span> </span>&#123;</span><br><span class="line">        <span class="keyword">return</span> mPhoneNumber;</span><br><span class="line">    &#125;</span><br><span class="line"></span><br><span class="line">    <span class="meta">@Bindable</span></span><br><span class="line">    <span class="function"><span class="keyword">public</span> String <span class="title">getCallButtonText</span><span class="params">()</span> </span>&#123;</span><br><span class="line">        <span class="keyword">return</span> mCallButtonText;</span><br><span class="line">    &#125;</span><br><span class="line"></span><br><span class="line">    <span class="meta">@Bindable</span></span><br><span class="line">    <span class="function"><span class="keyword">public</span> <span class="keyword">boolean</span> <span class="title">getIsTranslated</span><span class="params">()</span> </span>&#123;</span><br><span class="line">        <span class="keyword">return</span> mIsTranslated;</span><br><span class="line">    &#125;</span><br><span class="line"></span><br><span class="line">    <span class="meta">@Bindable</span></span><br><span class="line">    <span class="function"><span class="keyword">public</span> String <span class="title">getPhoneWord</span><span class="params">()</span> </span>&#123;</span><br><span class="line">        <span class="keyword">return</span> mPhoneWord;</span><br><span class="line">    &#125;</span><br><span class="line"></span><br><span class="line"></span><br><span class="line">    <span class="function"><span class="keyword">public</span> <span class="keyword">void</span> <span class="title">setPhoneWord</span><span class="params">(String phoneWord)</span> </span>&#123;</span><br><span class="line">        mPhoneWord = phoneWord;</span><br><span class="line">        onTranslate(<span class="keyword">null</span>);</span><br><span class="line"></span><br><span class="line">    &#125;</span><br><span class="line"></span><br><span class="line">    <span class="function"><span class="keyword">public</span> <span class="keyword">void</span> <span class="title">onTranslate</span><span class="params">(View v)</span> </span>&#123;</span><br><span class="line">        mPhoneNumber = toNumber(mPhoneWord);</span><br><span class="line"></span><br><span class="line">        <span class="keyword">if</span> (TextUtils.isEmpty(mPhoneNumber)) &#123;</span><br><span class="line">            mCallButtonText = <span class="string">"Call"</span>;</span><br><span class="line">            mIsTranslated = <span class="keyword">false</span>;</span><br><span class="line">        &#125; <span class="keyword">else</span> &#123;</span><br><span class="line">            mIsTranslated = <span class="keyword">true</span>;</span><br><span class="line">            mCallButtonText = <span class="string">"Call "</span> + mPhoneNumber + <span class="string">"?"</span>;</span><br><span class="line">        &#125;</span><br><span class="line">        notifyPropertyChanged(net.opgenorth.phoneword.BR.phoneNumber);</span><br><span class="line">        notifyPropertyChanged(net.opgenorth.phoneword.BR.isTranslated);</span><br><span class="line">        notifyPropertyChanged(net.opgenorth.phoneword.BR.callButtonText);</span><br><span class="line">    &#125;</span><br><span class="line">&#125;</span><br></pre></td></tr></table></figure><p>Here I've encapsulated logic into a view class that subclasses <code>BaseObservable</code>. Subclassing isn't mandatory – a naked POJO will work too. However, by making a custom view <code>BaseObservable</code> provides the infrastructure for setting up the data binding; and this custom view class can notify registered listeners as values change. As well, POJO's should be kept as dumb as possible without any intricate knowledge of views. By sticking the data binding logic in a view class like this I, honour the whole &quot;separation of concerns&quot; concept.</p><p>Notice that the getters are adorned with the <code>@Bindable</code> annotation - this identifies how the listeners should retrieve values from the properties.</p><p>It's the responsibility of the bound class to notify clients when a property has changed. You can see this happening with the use of <code>notifyPropertyChanged</code>. This causes a signal to be raised to listeners; this is how they find out the name has changed.</p><p>The <code>BR</code> class is generated by the data binding library. It is to data binding what the <code>R</code> class is to layout files. Each POJO field or method adorned with <code>@Bindable</code> will have a constant declared in the <code>BR</code> class at compile time corresponding to the name. So, <code>getPhoneNumber()</code> becomes <code>BR.phoneNumber</code>.</p><p>With the code out of the way, it's time to update the layout.</p><h2>Update the XML Layout</h2><p>There were a couple of changes that I needed to make to my existing layout for things to work:</p><ol><li>Declare some variables in my layout.</li><li>Identify properties on the various widgets that will be bound to the variable declared above.</li><li>Establish the data binding in the Activity.</li></ol><p>Android's data binding requires that <code>&lt;layout&gt;</code> be the root element of the layout. My old layout started with a <code>&lt;LinearLayout&gt;</code>. It's also necessary to add a <code>&lt;data/&gt;</code> section that will declare variables and the classes that will be bound to.</p><h3>Declare A Variable</h3><p>We need to declare a variable that the data binding framework can... bind too. I had to add a <code>&lt;data&gt;</code> element with a child <code>&lt;variable&gt;</code> element that names the variable and identifies the type Android should use for the binding:</p><figure class="highlight xml"><table><tr><td class="gutter"><pre><span class="line">1</span><br><span class="line">2</span><br><span class="line">3</span><br><span class="line">4</span><br><span class="line">5</span><br><span class="line">6</span><br><span class="line">7</span><br><span class="line">8</span><br><span class="line">9</span><br><span class="line">10</span><br><span class="line">11</span><br></pre></td><td class="code"><pre><span class="line"><span class="tag">&lt;<span class="name">layout</span> <span class="attr">xmlns:android</span>=<span class="string">"http://schemas.android.com/apk/res/android"</span></span></span><br><span class="line"><span class="tag"><span class="attr">xmlns:app</span>=<span class="string">"http://schemas.android.com/apk/res-auto"</span>&gt;</span></span><br><span class="line"><span class="tag">&lt;<span class="name">data</span>&gt;</span></span><br><span class="line"><span class="tag">&lt;<span class="name">variable</span></span></span><br><span class="line"><span class="tag"><span class="attr">name</span>=<span class="string">"phonewordVM"</span></span></span><br><span class="line"><span class="tag"><span class="attr">type</span>=<span class="string">"net.opgenorth.phoneword.PhonewordViewModel"</span> /&gt;</span></span><br><span class="line"><span class="tag">&lt;/<span class="name">data</span>&gt;</span></span><br><span class="line"></span><br><span class="line"><span class="comment">&lt;!-- my old layout is here, but omitted for clarity --&gt;</span></span><br><span class="line"></span><br><span class="line"><span class="tag">&lt;/<span class="name">layout</span>&gt;</span></span><br></pre></td></tr></table></figure><p>This declares a variable <code>phonewordVM</code> that I can use inside my layout file.</p><p>Notice that the <code>xmlns:app=&quot;http://schemas.android.com/apk/res-auto&quot;</code> will automatically drag local namespaces into your XML. This helps you out a bit because you don't have to explicitly declare all the namespaces in layout file.</p><h3>Declare the Bindings in the Layout</h3><p>Next, I need to set up the binding. In this example, all I want to do is to bind <code>setPhoneWord()</code>/<code>getPhoneWord()</code> in my custom view class to an <code>EditText</code>. This little XML snippet shows the binding in action:</p><figure class="highlight xml"><table><tr><td class="gutter"><pre><span class="line">1</span><br><span class="line">2</span><br><span class="line">3</span><br><span class="line">4</span><br><span class="line">5</span><br><span class="line">6</span><br><span class="line">7</span><br><span class="line">8</span><br><span class="line">9</span><br></pre></td><td class="code"><pre><span class="line"><span class="tag">&lt;<span class="name">EditText</span></span></span><br><span class="line"><span class="tag"><span class="attr">android:id</span>=<span class="string">"@+id/phoneword_text"</span></span></span><br><span class="line"><span class="tag"><span class="attr">android:layout_width</span>=<span class="string">"fill_parent"</span></span></span><br><span class="line"><span class="tag"><span class="attr">android:layout_height</span>=<span class="string">"wrap_content"</span></span></span><br><span class="line"><span class="tag"><span class="attr">android:layout_marginLeft</span>=<span class="string">"10dp"</span></span></span><br><span class="line"><span class="tag"><span class="attr">android:layout_marginRight</span>=<span class="string">"10dp"</span></span></span><br><span class="line"><span class="tag"><span class="attr">android:hint</span>=<span class="string">"@string/phoneword_label_text"</span></span></span><br><span class="line"><span class="tag"><span class="attr">android:text</span>=<span class="string">"@&#123;phonewordVM.phoneWord&#125;"</span></span></span><br><span class="line"><span class="tag"><span class="attr">tools:ignore</span>=<span class="string">"TextFields"</span> /&gt;</span></span><br></pre></td></tr></table></figure><p>Notice the syntax to declare the binding: <code>@{phonewordVM.phoneWord}</code> – this is how I setup the binding in the layout file. With this in place, the last thing to do is to setup the data binding in the activity.</p><h1>Establish the Data Binding</h1><p>Finally, setting up the data binding. This is a very minimal amount of code. We no longer have to first get a reference to a view, access properties on the view, and then manually transfer the value of that view to some domain object or variable in our application. Android Data Binding takes are of all that for me.</p><p>Below is a snippet from the fragment:</p><figure class="highlight java"><table><tr><td class="gutter"><pre><span class="line">1</span><br><span class="line">2</span><br><span class="line">3</span><br><span class="line">4</span><br><span class="line">5</span><br><span class="line">6</span><br><span class="line">7</span><br><span class="line">8</span><br><span class="line">9</span><br><span class="line">10</span><br><span class="line">11</span><br><span class="line">12</span><br><span class="line">13</span><br><span class="line">14</span><br><span class="line">15</span><br><span class="line">16</span><br><span class="line">17</span><br><span class="line">18</span><br><span class="line">19</span><br><span class="line">20</span><br><span class="line">21</span><br><span class="line">22</span><br><span class="line">23</span><br><span class="line">24</span><br><span class="line">25</span><br><span class="line">26</span><br><span class="line">27</span><br><span class="line">28</span><br><span class="line">29</span><br><span class="line">30</span><br><span class="line">31</span><br><span class="line">32</span><br><span class="line">33</span><br><span class="line">34</span><br><span class="line">35</span><br><span class="line">36</span><br><span class="line">37</span><br><span class="line">38</span><br><span class="line">39</span><br><span class="line">40</span><br><span class="line">41</span><br><span class="line">42</span><br><span class="line">43</span><br><span class="line">44</span><br><span class="line">45</span><br><span class="line">46</span><br><span class="line">47</span><br><span class="line">48</span><br><span class="line">49</span><br><span class="line">50</span><br><span class="line">51</span><br><span class="line">52</span><br><span class="line">53</span><br><span class="line">54</span><br><span class="line">55</span><br><span class="line">56</span><br><span class="line">57</span><br></pre></td><td class="code"><pre><span class="line"></span><br><span class="line"><span class="keyword">public</span> <span class="class"><span class="keyword">class</span> <span class="title">MainActivityFragment</span> <span class="keyword">extends</span> <span class="title">Fragment</span> </span>&#123;</span><br><span class="line"></span><br><span class="line">    <span class="keyword">private</span> PhonewordViewModel mPhonewordViewModel;</span><br><span class="line">    <span class="keyword">private</span> FragmentMainBinding mBinding;</span><br><span class="line"></span><br><span class="line">    <span class="function"><span class="keyword">public</span> <span class="title">MainActivityFragment</span><span class="params">()</span> </span>&#123;</span><br><span class="line">    &#125;</span><br><span class="line"></span><br><span class="line">    <span class="meta">@Override</span></span><br><span class="line">    <span class="function"><span class="keyword">public</span> View <span class="title">onCreateView</span><span class="params">(LayoutInflater inflater, ViewGroup container, Bundle savedInstanceState)</span> </span>&#123;</span><br><span class="line">        mPhonewordViewModel = <span class="keyword">new</span> PhonewordViewModel();</span><br><span class="line"></span><br><span class="line">        mBinding = DataBindingUtil.inflate(inflater, R.layout.fragment_main, container, <span class="keyword">false</span>);</span><br><span class="line">        mBinding.setPhonewordVM(mPhonewordViewModel);</span><br><span class="line">        View v = mBinding.getRoot();</span><br><span class="line"></span><br><span class="line">        mBinding.callButton.setOnClickListener(</span><br><span class="line">                <span class="keyword">new</span> View.OnClickListener() &#123;</span><br><span class="line">                    <span class="meta">@Override</span></span><br><span class="line">                    <span class="function"><span class="keyword">public</span> <span class="keyword">void</span> <span class="title">onClick</span><span class="params">(View v)</span> </span>&#123;</span><br><span class="line">                        <span class="keyword">final</span> Intent callIntent = <span class="keyword">new</span> Intent(Intent.ACTION_CALL);</span><br><span class="line">                        AlertDialog.Builder alertDialogBuilder = <span class="keyword">new</span> AlertDialog.Builder(getActivity());</span><br><span class="line">                        alertDialogBuilder</span><br><span class="line">                                .setMessage(mBinding.callButton.getText())</span><br><span class="line">                                .setNeutralButton(R.string.call_button_text, <span class="keyword">new</span> DialogInterface.OnClickListener() &#123;</span><br><span class="line">                                    <span class="meta">@Override</span></span><br><span class="line">                                    <span class="function"><span class="keyword">public</span> <span class="keyword">void</span> <span class="title">onClick</span><span class="params">(DialogInterface dialog, <span class="keyword">int</span> which)</span> </span>&#123;</span><br><span class="line">                                        callIntent.setData(Uri.parse(<span class="string">"tel:"</span> + mPhonewordViewModel.getPhoneNumber()));</span><br><span class="line">                                        PhonewordUtils.savePhoneword(getActivity(), mPhonewordViewModel.getPhoneWord());</span><br><span class="line">                                        startActivity(callIntent);</span><br><span class="line">                                    &#125;</span><br><span class="line">                                &#125;)</span><br><span class="line">                                .setNegativeButton(R.string.cancel_text, <span class="keyword">new</span> DialogInterface.OnClickListener() &#123;</span><br><span class="line">                                    <span class="meta">@Override</span></span><br><span class="line">                                    <span class="function"><span class="keyword">public</span> <span class="keyword">void</span> <span class="title">onClick</span><span class="params">(DialogInterface dialog, <span class="keyword">int</span> which)</span> </span>&#123;</span><br><span class="line">                                        <span class="comment">// Nothing to do here.</span></span><br><span class="line">                                    &#125;</span><br><span class="line">                                &#125;)</span><br><span class="line">                                .show();</span><br><span class="line">                    &#125;</span><br><span class="line">                &#125;</span><br><span class="line">        );</span><br><span class="line"></span><br><span class="line"></span><br><span class="line">        mBinding.translateButton.setOnClickListener(<span class="keyword">new</span> View.OnClickListener() &#123;</span><br><span class="line">            <span class="meta">@Override</span></span><br><span class="line">            <span class="function"><span class="keyword">public</span> <span class="keyword">void</span> <span class="title">onClick</span><span class="params">(View v)</span> </span>&#123;</span><br><span class="line">                mPhonewordViewModel.setPhoneWord(mBinding.phonewordText.getText().toString());</span><br><span class="line">                mPhonewordViewModel.translatePhoneWord();</span><br><span class="line">            &#125;</span><br><span class="line">        &#125;);</span><br><span class="line"></span><br><span class="line">        <span class="keyword">return</span> v;</span><br><span class="line">    &#125;</span><br><span class="line">&#125;</span><br><span class="line"></span><br></pre></td></tr></table></figure><p>There are a couple of key things to notice here. First, observe that the fragment inflates a view called <code>fragment_main.xml</code>. The data binding library generates the code of a class called <code>FragmentMainBinding</code>. The name of the binding class is derived from the name of the layout file, with the work <code>Binding</code> appended to it.</p><p>Once the binding is instantiated, I tell it what object to bind to. The data binding library created a setter called <code>setPhonewordVM</code> – this is because we declared the variable <code>phonewordVM</code> in our layout file above.</p><p>Another interesting thing is that the code for the fragment does not use <code>findViewById</code> or hold a reference to any of the views layout. That is because the <code>FragmentMainBinding</code> has those references. So, for example, if I want to get the value of an <code>EditText</code> with the id <code>+@id/phonewordText</code>, then <code>mBinding.phonewordText.getText()</code> will do the trick.</p><p>I set the <code>OnClickListener</code> for the buttons in a very traditional way. In theory, the data binding library should allow to bind event listeners to methods on a view model. However, I have't been able to get that to work yet. Hopefully I'll have more luck next version of the data binding library (and/or an update to the docs for the data binding library)</p><h1>Sie Sind Fertig</h1><p>With all this, data binding has been accomplished. It may seem like a lot of code, and perhaps it is for such a trivial example. Where the true power of this comes into play is when you want to write tests for your code. Two way data binding lays the framework for the Model-View-View Model pattern, which in turn helps you create a loosely coupled app that is easier to test.</p>]]></content>
    
    <summary type="html">
    
      &lt;p&gt;In May, 2015 at Google announced &lt;a href=&quot;https://developer.android.com/tools/data-binding/guide.html&quot; target=&quot;_blank&quot; rel=&quot;noopener&quot;&gt;a data binding library for Android&lt;/a&gt;. It&#39;s long overdue – developers no longer have to come up with their own schemes for displaying or retrieving data from their views. With two-way data binding, it&#39;s possible to remove a lot of redundant boilerplate code from the activities and fragments that make up an application.&lt;/p&gt;
    
    </summary>
    
    
  </entry>
  
  <entry>
    <title type="html">Docker Containers Explained for the Novice</title>
    <link href="https://westerndevs.com/_/docker-containers-explained-for-the-novice/" rel="alternate" type="text/html"/>
    <id>https://westerndevs.com/_/docker-containers-explained-for-the-novice/</id>
    <published>2015-09-04T18:19:31.000Z</published>
    <updated>2026-03-22T17:42:31.821Z</updated>
	<author>
	
	  
	  <name>Tom Opgenorth</name>
	  <email>tom@opgenorth.net</email>
	
	  <uri>https://westerndevs.com</uri>
	</author>
    
    <content type="html"><![CDATA[<p>Over at the <a href="http://www.westerndevs.com/" target="_blank" rel="noopener">WesternDev</a> &quot;consortium&quot; a random discussion broke out about <em>containers</em>: what are they, how are they different from virtual machines, and how do they work. While no means a &quot;container expert&quot;, I have dabbled a bit and sought to add some clarity to the discussion. It seems that I made enough sense and so thought I would summarize the dicussion here.</p><a id="more"></a><p>The whole idea behind containers is to isolate an application in a known environment. This helps prevent strange interactions with other software or libraries installed as well. I think <a href="http://www.docker.com" target="_blank" rel="noopener">Docker</a> has the best, concise description of what containers are:</p><blockquote><p>Containers running on a single machine all share the same operating system kernel so they start instantly and make more efficient use of RAM.</p></blockquote><p>and</p><blockquote><p>... containers wrap up a piece of software in a complete filesystem that contains everything it needs to run: code, runtime, system tools, system libraries – anything you can install on a server. This guarantees that it will always run the same, regardless of the environment it is running in.</p></blockquote><p>So, while both containers and virtual machines provide isolation, they differ in how they do it. VM's will emulate the hardware; each VM thinks it's a computer with it's own CPU's, RAM, hard disk, kernel, etc. This isolation is provided by the virtualization host which runs on the hardware.</p><p>Containers, on the other hand, have a &quot;host&quot; that uses some kernel extensions to isolate software, but otherwise everything is running on the hardware. Containers share the host computer's RAM, CPUs, and even the kernel, however each container is secluded from the others and the host operating system. Because of this, containers can startup much faster and appear to be more responsive – they don't have to talk to a middle man to get access to the hardware.</p><p>Most modern Linux distros ship with somee <a href="https://linuxcontainers.org" target="_blank" rel="noopener">extensions</a> to support containers out of the box, so, in theory, you can just dive right and start creating containers without having to do anything extra on Linux.</p><p>In practice it's easier to use something like Docker to create and manage your containers. Docker also provides a way to share containers via <a href="https://hub.docker.com/" target="_blank" rel="noopener">DockerHub</a>. You search DockerHub for something you need, like say <a href="https://hub.docker.com/_/mono/" target="_blank" rel="noopener">Mono</a>, and then you grab the <a href="https://docs.docker.com/reference/builder/" target="_blank" rel="noopener">Dockerfile</a> (a recipe that tells Docker how to build the container), and away you go. Alternately, you can create your own custom Docker images based on an existing Dockerfile. It's kind of like subclassing a container, if you will.</p>]]></content>
    
    <summary type="html">
    
      &lt;p&gt;Over at the &lt;a href=&quot;http://www.westerndevs.com/&quot; target=&quot;_blank&quot; rel=&quot;noopener&quot;&gt;WesternDev&lt;/a&gt; &amp;quot;consortium&amp;quot; a random discussion broke out about &lt;em&gt;containers&lt;/em&gt;: what are they, how are they different from virtual machines, and how do they work. While no means a &amp;quot;container expert&amp;quot;, I have dabbled a bit and sought to add some clarity to the discussion. It seems that I made enough sense and so thought I would summarize the dicussion here.&lt;/p&gt;
    
    </summary>
    
    
  </entry>
  
</feed>